Table of Contents
Why Exporting Your Mailchimp Audience is Important
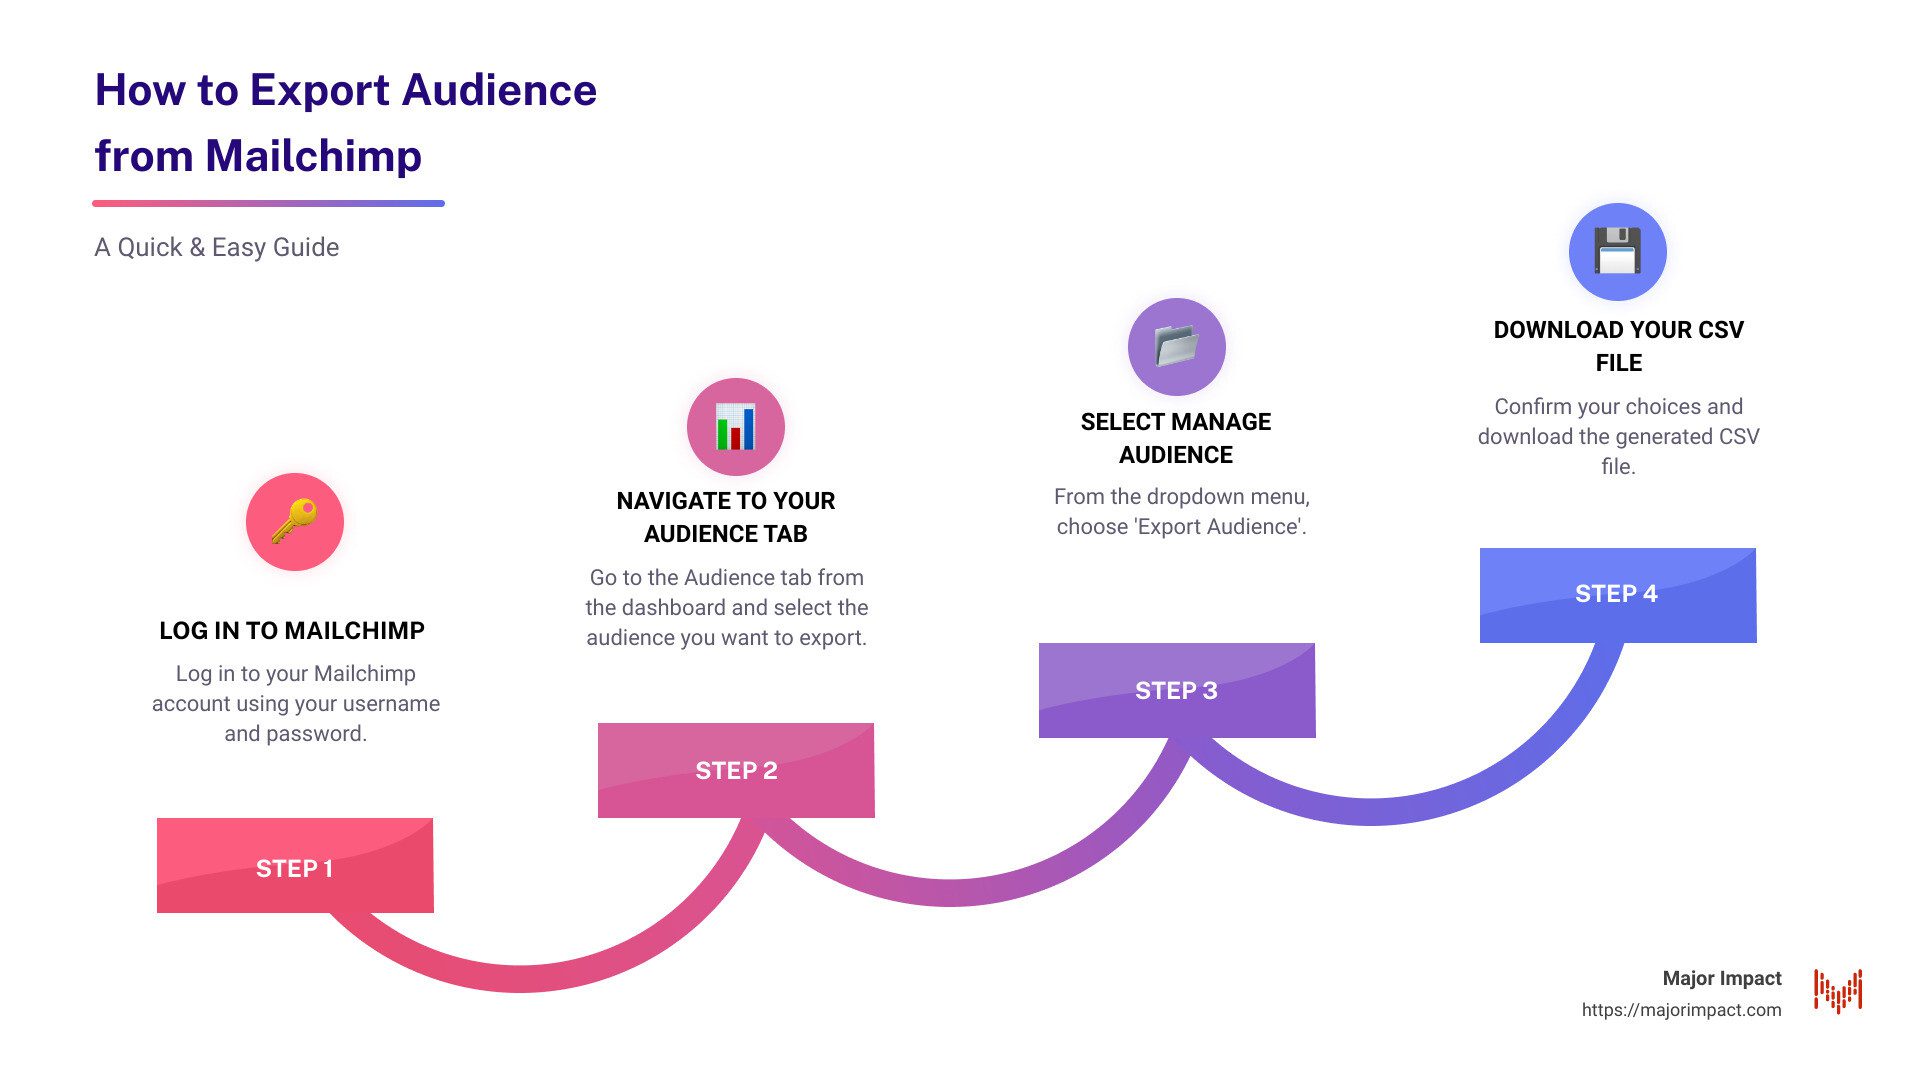
If you’re wondering how to export audience from Mailchimp quickly, here’s a simple breakdown:
- Log in to Mailchimp.
- Steer to your Audience tab.
- Select Manage Audience.
- Choose Export Audience.
- Download your CSV file.
Keeping a backup of your email marketing data is crucial for maintaining control and security over your contacts. Whether you are switching email platforms, conducting data analysis, or simply safeguarding your data, knowing how to export audience from Mailchimp ensures you have what you need.
This quick process helps you stay organized and compliant with data privacy regulations.
With over two decades in web design and e-commerce, I specialize in making complex tasks like how to export your audience from Mailchimp simple and efficient.
Next, learn the detailed steps to make exporting your Mailchimp audience even easier.
Steps to Export Your Mailchimp Audience
Exporting your Mailchimp audience is a straightforward process. Follow these simple steps to get your data exported as a CSV file.
Log in to Mailchimp
First, log in to your Mailchimp account using your username and password. If you don’t have an account yet, you’ll need to create one.
Steer to Your Audience
Once logged in, steer to the Audience dashboard. Click on the Audience tab at the top of the page. This will take you to a list of your audiences.
Access the Export Audience Option
Select the audience you want to export by clicking on its name. Inside the audience dashboard, locate the Manage Audience dropdown menu. Click on it and select Export Audience.
Choose Export Type
You’ll be presented with options for exporting your audience. Select CSV as the export format. You can also choose the specific fields you want to include in your CSV file.
Confirm and Export
Finally, confirm your choices and proceed with the export. Mailchimp will generate the CSV file and provide you with a download link. Click on the link to save the CSV file to your computer.
That’s it! You’ve successfully exported your Mailchimp audience as a CSV file.
Next, we’ll dive into how to export specific segments or groups from your Mailchimp audience.
Exporting Specific Segments or Groups
Export a Saved Segment
If you want to export a saved segment of your Mailchimp audience, follow these steps:
- Steer to Your Audience Dashboard: Go to the Audience tab and select the audience that contains the segment you want to export.
- Find Your Saved Segment: In the Audience dashboard, click on the “Segments” tab.
- Select the Segment: Choose the saved segment you want to export.
- Export the Segment: Click the “Export Segment” button and choose “CSV” as the export format.
Mailchimp will generate a CSV file containing only the contacts from your selected segment. This is useful for targeted analysis or marketing campaigns.
Export Tagged Contacts
To export tagged contacts from your Mailchimp audience, do the following:
- Go to Your Audience Dashboard: Click on the Audience tab and select the audience with the tagged contacts.
- Access Tags: Click on “Tags” to view all tagged contacts.
- Select the Tag: Choose the specific tag whose contacts you want to export.
- Export the Tagged Contacts: Click on “Export Tag” and choose “CSV” as the format.
This will generate a CSV file with only the contacts associated with the chosen tag. This is great for personalized marketing efforts.
Export a Group of Subscribers
To export a group of subscribers, follow these steps:
- Open the Audience Dashboard: Go to the Audience tab and select the audience containing the group you want to export.
- View Groups: Click on “Groups” to see the different groups within your audience.
- Select the Group: Choose the group you want to export.
- Export the Group: Click on “Export Group” and select “CSV” as the export format.
Mailchimp will create a CSV file with the subscribers from the selected group. This helps in managing and analyzing specific subsets of your audience.
By following these steps, you can easily export specific segments, tagged contacts, or groups from your Mailchimp audience, enabling more targeted and efficient marketing efforts.
Next, let’s look at how to export all your data from Mailchimp.
How to Export All Data from Mailchimp
Export Account Data
Backing up your entire Mailchimp account is crucial to safeguard your data. Here’s how to do it:
- Log In: First, log in to your Mailchimp account.
- Go to Account Settings: Click on your profile icon and select Account.
- Access Manage My Data: From the Settings drop-down menu, choose Manage my data.
- Select Data Types: Check the boxes next to the types of data you want to export.
- Choose Time Frame: Use the date drop-down to select a time frame for your export.
- Export Data: Click Export Data.
Mailchimp will bundle all of your selected data into a ZIP file. This process can take up to 24 hours, especially if you have a lot of data. Once complete, you can download the ZIP file from the Manage my data page in your account.
What Data Can Be Exported
Here’s a breakdown of what you can export from your Mailchimp account:
- Audiences: Includes separate files for cleaned, subscribed, transactional, and unsubscribed contacts.
- Reports: Contains folders with various reporting data such as opens, clicks, and unsubscribes.
- Templates: A folder with HTML files for all your email templates.
- Campaigns: A CSV of all regular emails, including a campaigns_content folder with HTML and TXT files.
- SMS Data: Information like SMS acquisition time, subscription status, and phone numbers.
- Content Studio Files: All image and content assets stored in the My files section.
- Events: A CSV of custom events with timestamps and email addresses.
What Data Cannot Be Exported
Some data types are not available for export:
- Deleted Audiences: Once deleted, audience data is permanently removed and cannot be recovered.
- Billing Receipts: Current and past billing statements are not included in account exports.
- Third-Party Information: Only data stored in Mailchimp can be exported. External systems need to be integrated or synced via API.
- Website Content: Content from social ads, remarketing ads, landing pages, and websites cannot be exported.
By understanding what data can and cannot be exported, you can better prepare for a comprehensive backup of your Mailchimp account. This ensures you have all necessary information stored securely outside of Mailchimp.
Next, we’ll answer some frequently asked questions about exporting Mailchimp audiences.
Frequently Asked Questions about Exporting Mailchimp Audiences
How do I copy an audience list in Mailchimp?
Copying an audience list in Mailchimp is straightforward. Here’s how you can do it:
- Log in to Mailchimp: Use your username and password to access your account.
- Steer to Your Audience: Click on the “Audience” tab at the top of the page.
- Select the Audience: Choose the audience list you want to copy.
- Export the Audience: Click on “Manage Audience” and select “Export Audience” from the dropdown menu. Choose “CSV” as the export format.
- Create a New Audience: After downloading the CSV file, go back to the Audience tab and click “Create Audience.”
- Import the CSV File: Upload the CSV file you just exported. This will replicate your audience list in a new audience.
By following these steps, you can easily replicate your audience list in Mailchimp.
How do I backup my Mailchimp audience?
Backing up your Mailchimp audience is essential for data security. Here’s a quick guide to do it:
- Log in to Mailchimp: Access your account using your credentials.
- Steer to Your Audience: Click on the “Audience” tab.
- Select the Audience: Choose the audience you want to back up.
- Export the Audience: Click on “Manage Audience” and select “Export Audience.” Choose “CSV” as the export format.
- Download the CSV File: Mailchimp will generate a download link for your CSV file. Click the link to save it to your computer.
Regularly backing up your audience ensures you have a secure copy of your data, which can be crucial in case of any data loss or cyber incidents.
Can you separate audiences in Mailchimp?
Yes, you can separate audiences in Mailchimp using tags, segments, and groups. Here’s how:
- Tags: Tags allow you to label your contacts based on specific criteria. For example, you can tag contacts as “VIP Customers” or “Newsletter Subscribers.” This helps in organizing and targeting specific groups within your audience.
- Segments: Segments are dynamic collections of contacts that meet certain conditions. For instance, you can create a segment of contacts who have opened your last five emails. Segments update automatically as contacts meet the defined conditions.
- Groups: Groups are a way to categorize your contacts based on their interests or preferences. For example, you can create groups like “Product Updates” or “Event Invitations.” Contacts can choose which groups they want to be part of, giving them control over the content they receive.
Using these features, you can effectively manage and target different subsets of your audience in Mailchimp.
By understanding these common questions about exporting Mailchimp audiences, you can better manage your email marketing efforts.
Conclusion
Exporting your Mailchimp audience is a crucial step for managing and safeguarding your data. Whether you’re looking to back up your contacts or analyze your marketing performance, knowing how to export audience from Mailchimp is essential.


