Table of Contents
Enhancing Your Emails with GIFs
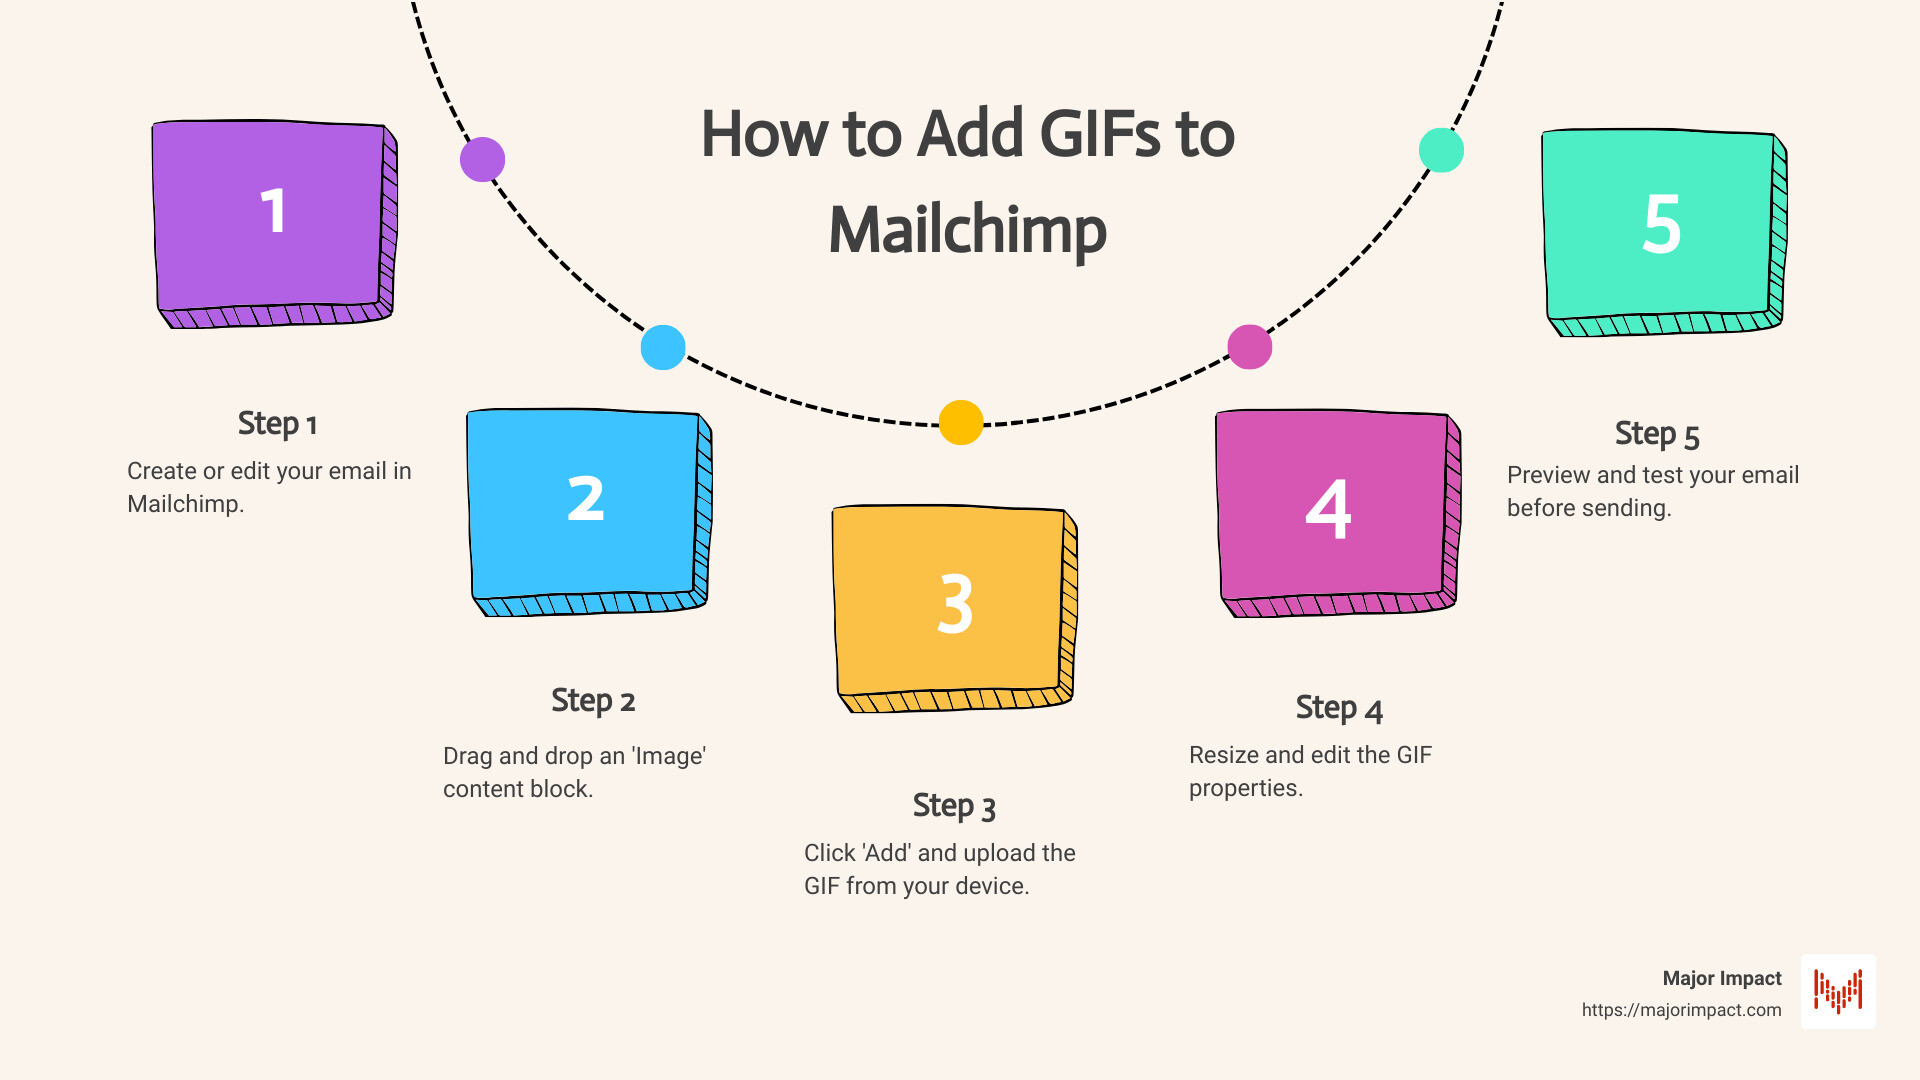
When it comes to boosting engagement in email marketing, adding GIFs can be a game-changer. If you’re wondering how to add GIFs to Mailchimp, here’s a quick answer:
- Create or edit your email in Mailchimp.
- Drag and drop an “Image” content block into your email layout.
- Click “Add” and upload the GIF from your device.
- Resize and edit the GIF properties as needed.
GIFs are perfect for making your emails more dynamic and fun. They catch your readers’ attention and can convey emotions or actions better than static images. In Mailchimp, adding a GIF is easy if you follow the right steps.
I’m Elliott Kosmicki. With years of experience in web design, marketing, and SEO, I’ve helped businesses effectively use GIFs in email campaigns, especially in how to add GIFs to Mailchimp. Let’s dive further into how you can use this great feature within your campaigns.
Why Use GIFs in Your Email Campaigns?
GIFs are more than just fun visuals. They can significantly improve your email marketing campaigns. Here’s why:
Boost Engagement
Emails with GIFs can increase engagement rates. According to Social Media Today, GIFs are extremely attention-grabbing and can make your emails stand out in a crowded inbox. People are naturally drawn to movement, and a well-placed GIF can make your email more appealing and interactive.
Improve Visual Appeal
GIFs add a dynamic element to your emails that static images just can’t match. A beautiful, animated GIF can make your message more compelling. For example, Solestruck used GIFs to showcase a variety of funky boots in their email, making the email visually interesting and engaging.
Convey Emotions
GIFs are great for conveying complex emotions quickly. They can express excitement, urgency, or even humor in a way that words can’t. For instance, Netflix used a GIF of Frank Underwood from “House of Cards” to generate buzz and anticipation for the show’s premiere. This emotional connection can make your email more memorable.
Interactive Content
Emails with interactive elements, like GIFs, can drive more clicks and actions. Mailchimp used a GIF to illustrate how to use their new template editor. This not only made the email more engaging but also provided clear instructions to the users, enhancing their experience.
Statistics Speak
According to LinkedIn, relevant and eye-catching images can improve engagement by 650%. Incorporating GIFs can be an easy way to achieve this boost.
Case Studies
- Ipsy: Used a GIF of a moving bunny to create a sense of urgency, encouraging users to hop on their invite.
- Loeffler Randall: Highlighted both the “Shop Now” button and the latest Rider bag styles using a colorful GIF, making the call-to-action more prominent.
By using GIFs thoughtfully, you can make your emails more engaging, visually appealing, and emotionally resonant. Ready to add some flair to your emails? Let’s explore how to add GIFs to Mailchimp next.

How to Add GIFs to Mailchimp
Ready to add some flair to your emails? Let’s explore how to add GIFs to Mailchimp step-by-step.
Using Mailchimp’s Content Studio
Mailchimp’s Content Studio offers an easy way to add GIFs to your emails. Here’s how:
- Create or Edit an Email: Start by creating a new email or editing an existing one.
- Drag and Drop an Image Block: Drag an “Image” content block into your email layout.
- Add a GIF: Click the “Add” button and choose to upload a GIF from your device or select from Mailchimp’s Content Studio.
Mailchimp integrates with Giphy, allowing you to search and insert GIFs directly from their vast library. Simply type a keyword into the Giphy search bar within the Content Studio and select your desired GIF.
Uploading Your Own GIFs
Want to use a GIF that’s not from Giphy? No problem. Follow these steps to upload your own GIFs:
- Upload from Device: Click the “Add” button in the image content block, then select “Upload” to add a GIF from your device.
- Check Image Requirements: Ensure your GIF meets Mailchimp’s image requirements. The file should be in .gif format, and it’s best to keep the file size under 1MB to ensure quick loading times.
Pro Tip: If your GIF is too large, reduce the number of frames or colors to decrease the file size.
Editing and Customizing GIFs in Mailchimp
After uploading your GIF, you might want to make some adjustments. Here’s how:
- Resize the GIF: Use the editing pane to resize your GIF to fit your email layout.
- Edit Properties: Adjust properties such as alignment, padding, and borders.
- Add Alt Text: Double-click the GIF to open the image properties. Add alt text to make your email accessible to all users.
- Click-Through URL: Want to make your GIF clickable? Add a URL in the image properties to direct users to a specific webpage.
By following these steps, you can easily add and customize GIFs in your Mailchimp emails, making them more engaging and visually appealing.
Next, we’ll discuss Best Practices for Using GIFs in Emails to ensure your campaigns are effective and professional.
Best Practices for Using GIFs in Emails
Adding GIFs to your emails can make them more engaging and visually appealing. But to get the most out of them, you need to follow some best practices. Here’s how to do it right:
GIF Size Limit
Keep your GIFs under 1MB. Large GIFs can slow down your email’s load time, especially on mobile devices. A slow-loading email can frustrate your subscribers and lead them to close it before it fully loads.
Example: According to Social Media Today, keeping your email under 102KB ensures that Gmail will display the entire email.
Optimize for Email
Reduce the number of colors and frames in your GIFs. This helps decrease the file size without sacrificing too much quality. Tools like Creatomate can help you create optimized GIFs.
Example: Solestruck used a simple GIF to showcase an assortment of products, making their email visually appealing without compromising on load time.
Avoid Overuse
Use no more than one or two GIFs per email. Too many moving images can overwhelm your readers and distract from your main message. Each GIF should serve a specific purpose, such as highlighting a call-to-action or demonstrating a product feature.
Example: Loeffler Randall used a single GIF to highlight the “Shop Now” button, making it stand out without overwhelming the reader.
Test Before Sending
Always preview and test your emails before sending them out. Make sure your GIFs display correctly across different email clients and devices. Mailchimp’s preview mode can help you see how your email will look to your subscribers.
Example: In Mailchimp, go to Preview and click Enter preview mode. Turn on enable live merge tag info to see a couple of previews of what the email banner will look like for your subscribers.
By following these best practices, you can ensure that your GIFs improve your emails rather than detract from them. Next, we’ll discuss Troubleshooting Common Issues to help you resolve any problems that may arise with your GIFs in Mailchimp.
Troubleshooting Common Issues
GIF Not Working
Sometimes, your GIFs might not work as expected in Mailchimp. This can be frustrating, but there are a few common reasons and easy fixes to try:
- Check the file size: Mailchimp recommends keeping images under 1MB. Large files can slow down loading times or fail to display.
- Verify the file format: Ensure your GIF is in the correct format. Mailchimp supports .gif files, but not all GIFs are created equally.
- Optimize your GIF: Use tools like GIMP to resize or reduce the number of frames. This can help with performance issues.
If these steps don’t resolve the issue, consider reaching out to Mailchimp support for further assistance.
Preview Issues
Previewing your email is crucial to ensure everything looks right before sending. If your GIF doesn’t appear in the preview, try these steps:
- Refresh the page: Sometimes, a simple refresh can resolve display issues.
- Check the dimensions: Make sure your GIF fits within the content block. Oversized GIFs might not render correctly.
- Test in different browsers: Browser compatibility can vary. If it looks fine in one but not another, this might be the issue.
Size and Format Problems
Size and format problems are common when adding GIFs to emails. Here’s how to handle them:
- Reduce the file size: Use online tools like EZGIF to compress your GIF without losing quality.
- Check the resolution: High-resolution GIFs can be too large. Aim for a resolution that balances quality and load time.
- Limit the number of frames: Fewer frames mean a smaller file size. This reduces the chance of encountering issues.
Browser Compatibility
Not all email clients support GIFs the same way. For instance, older versions of Outlook may only display the first frame of your GIF. Here’s how to address browser compatibility:
- Design with the first frame in mind: Ensure the first frame of your GIF conveys the essential message, as it might be the only part that displays.
- Test across multiple clients: Use tools like Litmus to see how your email looks in different email clients.
- Keep it simple: Avoid overly complex GIFs. Simple animations are more likely to work across various platforms.
By following these troubleshooting tips, you can ensure your GIFs look great and function properly in your Mailchimp emails. Next, we’ll dive into Frequently Asked Questions about Adding GIFs to Mailchimp to address any lingering concerns.
Frequently Asked Questions about Adding GIFs to Mailchimp
Can you add a non-GIPHY GIF to a Mailchimp email?
Yes, you can add a non-GIPHY GIF to a Mailchimp email. Here’s how:
- Upload from Device:
- Go to your Mailchimp account.
- Create a new email or edit an existing one.
- Drag and drop an “Image” content block into your email layout.
- Click “Add” and upload the GIF from your device.
- Image Requirements:
- Ensure your GIF meets Mailchimp’s image requirements. The file should be under 10MB, but it’s best to keep it under 1MB for optimal performance.
- The dimensions should be appropriate for your email layout. Mailchimp recommends a width of 600 pixels for images.
- File Size:
- Large GIFs can slow down email load times. If your GIF is too large, consider reducing the number of frames or colors to decrease the file size.
Why isn’t my GIF displaying correctly in Mailchimp?
Sometimes, your GIF might not display correctly due to several reasons:
- File Size and Format Issues:
- Ensure your GIF is under the 10MB limit. If it’s too large, Mailchimp might not display it correctly.
- Check the format. Your GIF should be in a standard .gif format.
- Troubleshooting Steps:
- Check Image Dimensions: Make sure your GIF dimensions are appropriate. Oversized images might not render well.
- Test in Different Browsers: Sometimes, the issue might be browser-specific. Try viewing your email in different browsers to see if the problem persists.
- Preview Issues: If your GIF meets all requirements and still doesn’t display, try re-uploading it or using a different browser or device to upload.
How can I optimize GIFs for email?
Optimizing your GIFs ensures they load quickly and maintain quality:
- Reduce File Size:
- Use tools like EZGIF or GIMP to reduce the number of frames, colors, or overall dimensions of your GIF.
- Aim to keep your GIF under 1MB for best performance.
- Maintain Quality:
- While reducing file size, ensure the quality isn’t compromised. Balance between size and clarity for the best results.
- Test different compression settings to find the sweet spot where your GIF looks good but isn’t too large.
- Testing:
- Always test your email before sending it out. Use tools like Litmus to see how your email looks across different email clients and devices.
- Make sure the first frame of your GIF is compelling, as some email clients might only display the first frame.
By following these guidelines, you can effectively add and optimize GIFs in your Mailchimp emails, ensuring they look great and function properly across all platforms.
Conclusion
Incorporating GIFs into your Mailchimp emails can significantly improve your marketing efforts. By doing so, you can increase engagement, boost visual appeal, and create a more interactive experience for your audience.