Table of Contents
Showing the Power of Mailchimp Surveys
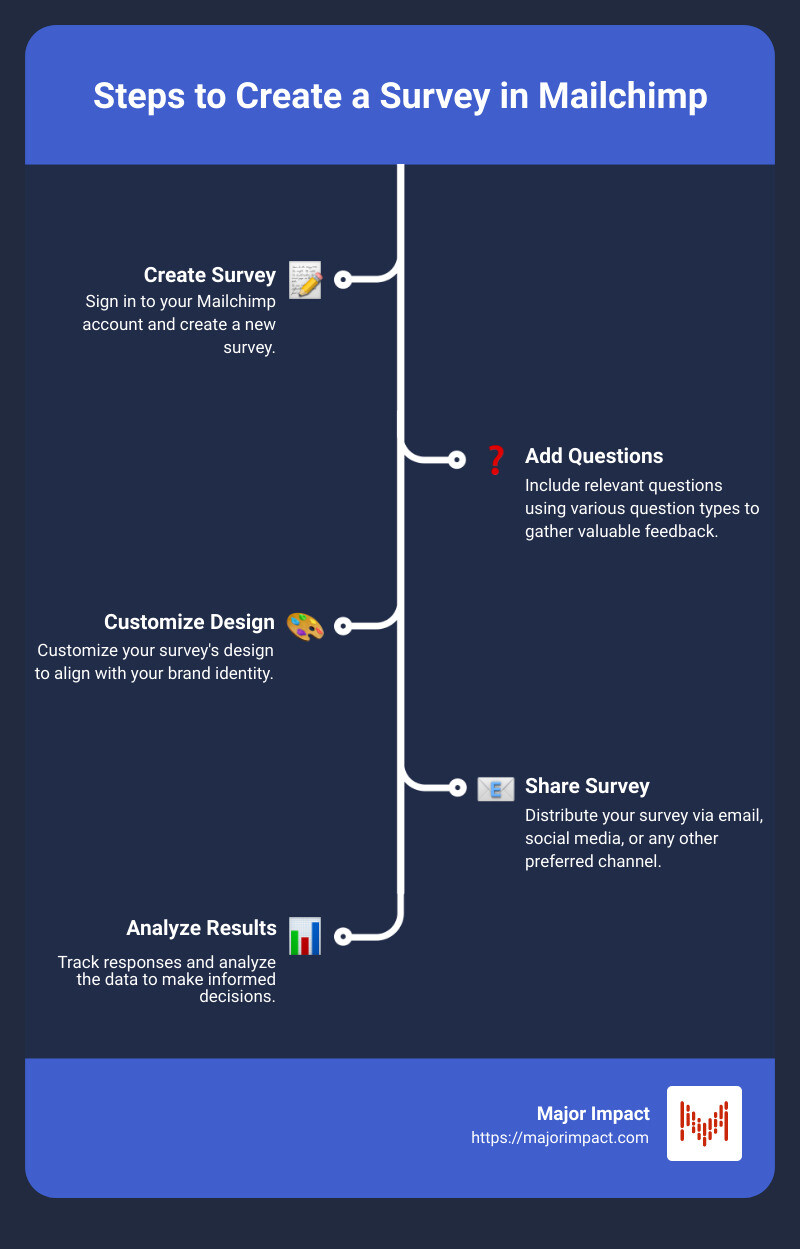
Understanding how to create a survey in Mailchimp can boost your business by tapping directly into what your customers think and want. With Mailchimp’s easy-to-use platform, gathering actionable insights has never been more accessible. Here’s a quick, step-by-step glimpse:
- Create a Survey in Mailchimp Account
- Add Relevant Questions
- Customize Your Survey Design
- Share Your Survey via Email or Social Media
- Analyze the Results
Creating surveys is essential for small businesses aiming to improve customer satisfaction and boost sales. Surveys gather valuable feedback, uncovering what delights or troubles your customers, and pointing to areas in your services or products that need improvement.
Mailchimp’s capabilities make this process smooth and straightforward. As an all-in-one marketing platform, Mailchimp allows you to construct detailed surveys, share them effortlessly, and track the responses effectively. Whether you need radio buttons, checkboxes, or open text responses, Mailchimp’s survey tools deliver precisely what you need to make informed business decisions.
I’m Elliott Kosmicki, and I’ve spent two decades helping businesses like yours grow by leveraging user-friendly tools like Mailchimp. Let’s dive deeper into how to set up and use Mailchimp surveys to get the feedback you need.
Getting Started with Mailchimp Surveys
Before you begin creating surveys in Mailchimp, it’s important to understand the initial steps to get started. This section covers account setup, user level requirements, and audience selection.
Account Setup
First, you’ll need a Mailchimp account. If you don’t have one, sign up at Mailchimp. You can start with the free plan, which is great for small businesses with fewer than 2,000 subscribers.
After signing up, you’ll need to activate your account via the email Mailchimp sends you. Follow the steps to input your address, goals, and number of email contacts. This setup process helps Mailchimp customize your experience.
User Level Requirements
To create surveys, your account user level must be Manager or higher. If you’re not sure about your user level, check your account settings under “Account” > “Settings” > “Users.” If needed, ask your account admin to upgrade your user level.
Audience Selection
Each survey in Mailchimp is tied to a specific audience. This means you must select an audience before you create a survey.
Important Note: Once you finalize a survey, you can’t change the audience. So, choose wisely!
To select your audience:
- Log into your Mailchimp account.
- Steer to the Audience section on the left-hand menu.
- Click on Surveys.
- Choose the audience you want to associate with your survey.
Selecting the right audience is crucial because all responses will be collected in that audience, and new respondents who provide their email addresses will be added as subscribed contacts.
Next, we’ll dive into the step-by-step process of how to create a survey in Mailchimp, including adding questions and designing your survey for maximum impact.
How to Create a Survey in Mailchimp
Adding Content to Your Survey
Once you’ve selected your audience, it’s time to create your survey and add content. Follow these steps:
- Click “Create Survey”: Start by clicking the “Create Survey” button.
- Add Questions: Click the plus icon (+) to add different types of questions or sections.
Question Types
Mailchimp offers a variety of question types to suit your needs:
- Introduction: Add a welcoming text, image, or video from YouTube/Vimeo.
- Radio Buttons: Create multiple-choice questions where respondents select only one option.
- Checkboxes: Allow multiple selections for a question.
- Range: Use scales with numbers, stars, emojis, or hearts.
- Open Text: Provide a text field for free-form answers.
- Email: Collect respondent email addresses.
- Contact Information: Gather details like age, gender, and address.
- Content Block: Insert text, images, or videos between questions.
Adding an Introduction
To add an introduction:
1. Click the plus icon (+).
2. Select Introduction.
3. Use the Add drop-down to upload an image or embed a video.
4. Enter your welcoming text.
Adding Questions
- Click the plus icon (+).
- Choose a question type (e.g., Radio Buttons, Checkboxes).
- Type your question in the What would you like to ask? field.
- Enter answer options. Hit Enter or Return to add more options.
- Use the Toggle Other Option slider if you want respondents to add their own answer.
Making Questions Required
To ensure respondents answer a question before submitting:
1. In the Section Type sidebar, toggle on the Required slider.
Auto-Tagging
Auto-tagging helps you categorize contacts based on their responses. Toggle the Auto-tagging slider on and click Manage Tagging to apply tags.
Repeat these steps to add more sections or questions. You can also Duplicate Question to make a copy or Delete Question to remove it.
Designing Your Survey
Designing your survey is crucial for making it visually appealing and on-brand. Here’s how to do it:
Branding
- Custom Messaging: Add custom messages that align with your brand’s voice.
- Styles: Customize fonts, colors, and button styles to match your brand.
Customizing Styles
- Fonts: Choose fonts that are consistent with your brand.
- Colors: Use your brand’s color palette.
- Button Styles: Customize buttons for a cohesive look.
By following these steps, you can create a well-designed, engaging survey that reflects your brand and gathers valuable feedback.
Next, we’ll explore how to share your Mailchimp survey across various platforms like email, social media, and more.
Sharing Your Mailchimp Survey
You’ve crafted your survey, and now it’s time to share it with your audience. Mailchimp provides several options to make your survey accessible and easy to distribute. Let’s dive into the different ways you can share your survey.
Share Options
Mailchimp allows you to share your survey through various channels, ensuring you reach your audience where they are most active.
One of the most effective ways to distribute your survey is via email. Mailchimp makes this easy:
- Share by Email: In the Survey Location section, move the slider to Turn On. You’ll see an option to share by email. This method is ideal for targeting your existing email list.
- Embed Survey in Email Campaigns: You can also embed the survey link directly in your email campaigns. This way, you can leverage your regular email communication to gather responses.
Social Media
Mailchimp provides built-in options to share your survey on major social media platforms:
- Facebook: Click on the Facebook icon to share your survey directly on your Facebook page. This is a great way to reach your followers and encourage them to participate.
- X (formerly Twitter): Share your survey on X by clicking the X icon. This can help you engage with a broader audience who may not be on your email list.
URL
Mailchimp generates a unique URL for your survey, which you can share anywhere:
- Copy URL: Simply copy the URL provided by Mailchimp and paste it wherever you can embed links. This could be in blog posts, on your website, or even in a landing page dedicated to your survey.
- Versatile Sharing: The URL can be shared via messaging apps, forums, or any other platform where your audience is active.
Practical Tips
- Promote Across Channels: Don’t limit yourself to one platform. Share your survey across multiple channels to maximize reach.
- Encourage Sharing: Ask your audience to share the survey with their networks. This can exponentially increase your response rate.
By utilizing these sharing options, you can ensure your survey reaches a wide audience, providing you with valuable insights to improve your business.
Next, we’ll look at how to view and export the results of your Mailchimp survey.
Viewing and Exporting Survey Results
Once your survey is live and responses start rolling in, it’s crucial to know how to view and export survey results in Mailchimp. This helps you analyze the data effectively and make informed decisions for your business.
Results Overview
In the Results section of your survey page, Mailchimp provides a snapshot of your survey responses. You’ll see the total number of responses from Known Contacts, Unknown Contacts, and New Contacts.
- Known Contacts: These are existing contacts in your audience or new contacts who joined your audience by providing their email address in the survey.
- Unknown Contacts: Respondents who didn’t provide an email address. If your survey didn’t include an email question, all respondents will fall into this category.
- New Contacts: New additions to your audience who provided their email address when completing the survey.
Viewing Responses
To dive deeper into the responses, steer to the Surveys page and select the specific survey you want to review. Mailchimp offers three ways to view your survey data:
- Chart View: Displays all responses for each survey question. Depending on the question type, responses are shown via text, graph, or chart. You can click each answer to see who submitted it and tag those contacts. For questions using ranges, radio buttons, or checkboxes, you can view a graph of how respondents answered over the last 7, 30, 90, or 365 days.
- Table View: Presents all responses in text format, making it easy to read through individual answers without graphical representations.
- Individual View: Shows how each respondent answered every question. You can cycle through responses using the Next response or Previous response buttons.
Exporting Results
Mailchimp makes it easy to export your survey results for further analysis. Here’s how you can do it:
- Export as CSV: Click Export results to download a CSV file of your survey responses. This is useful for analyzing data in spreadsheet software like Excel or Google Sheets.
- Export as PDF: You can also download a PDF of all the charts and graphs shown on the Review your results page. This format is ideal for sharing visual data insights with your team.
By viewing and exporting your survey results efficiently, you can gain valuable insights and make data-driven decisions to improve your business strategies.
Next, we’ll address some frequently asked questions about Mailchimp surveys.
Frequently Asked Questions about Mailchimp Surveys
Can I create a survey in Mailchimp?
Yes, you can create a survey directly in Mailchimp using their hosted survey form. This feature allows you to design and manage surveys within the Mailchimp platform. Once your survey is ready, you can share it via email campaigns, social media, or a direct URL. Hosted surveys are a straightforward way to gather feedback from your audience without needing additional tools.
How do I create a survey in an email?
To create a survey in an email, you have a couple of options:
- Mailchimp’s Hosted Survey URL: Create a survey in Mailchimp and then embed the survey link in your email. This method ensures your email remains clean and uncluttered while still directing recipients to your survey.
- Embed Google Forms: Another option is to create a survey using Google Forms and embed the form link in your Mailchimp email. Google Forms is flexible and easy to use, making it a popular choice for many businesses.
- Merge Tag Surveys and Polls: For simpler surveys, you can use Mailchimp’s merge tags to embed a single-question poll directly in your email. This method is great for quick feedback.
Can you embed SurveyMonkey into Mailchimp?
For comprehensive survey capabilities, we recommend using Mailchimp’s own survey tools, which are fully compatible with our email marketing strategies. This ensures seamless integration and management of your campaigns.
By using Mailchimp’s survey tools, you can create effective surveys and gather valuable insights to improve your business strategies.
Conclusion
Creating surveys in Mailchimp is a powerful way to gather valuable insights from your customers. By understanding their needs, preferences, and pain points, you can make informed decisions to improve your products, services, and overall customer experience.


